Avoiding Green Screen Spill with the FLBL Technique
- Dale Hayward
- May 2, 2025
- 2 min read
Updated: Oct 8, 2025
Technique to avoid green screen spill
Green screen can be a powerful tool in stop motion animation, but it comes with its fair share of headaches—especially when it comes to colour spill, messy keying, or unwanted transparency. We've encountered these challenges across many projects, including recent work on Chex cereal ads, where the sets included delicate white elements like clouds, packaging, and even a unicorn.

To overcome these issues, we rely on a technique called Front Light/Back Light (FLBL)—a clever method that dramatically improves compositing quality by minimizing green spill and preserving edge detail.


What is the FLBL Technique?
FLBL stands for Front Light / Back Light, and it involves shooting two exposures of each frame using different lighting setups:
Exposure 1 – The Main Light Pass:
Your usual animation lighting setup.
Lights on the character, set, and subject matter.
Used to capture the final image.
Exposure 2 – The Silhouette Pass:
All front lights are turned off.
Only the backlight (a pure white background) is turned on.
Characters appear as black silhouettes against a bright background.
This combination gives us a clean Luma Matte for compositing—essentially creating a perfect cutout without the mess of colour keying.


Why Use FLBL?
Avoids colour spill, especially with white or reflective surfaces.
Ideal when both green and blue appear in your scene
Preserves fine edges and soft shadows without compromising your subject.
Reduces post-production cleanup.
Our Setup: Tools & Workflow
To control lighting for each exposure, we use the Dragonframe DDMX-512, which allows us to program lighting via DMX directly from Dragonframe.
Hardware Setup:
Dragonframe DDMX-512 (USB connection to software)
DMX Dimmer Switch
Lights connected via XLR or power plugs
Programming in Dragonframe:
Channel Setup: Match your dimmer switch channels with Dragonframe’s interface.
Split Exposure Control: Unlink exposure settings from the global settings.
Exposure X1 (Main Light): Program your animation lighting here.
Exposure X2 (Backlight): Turn off all front lights and activate only the backlight at 100%.
Once both exposures are captured, it’s time to move into post-production.


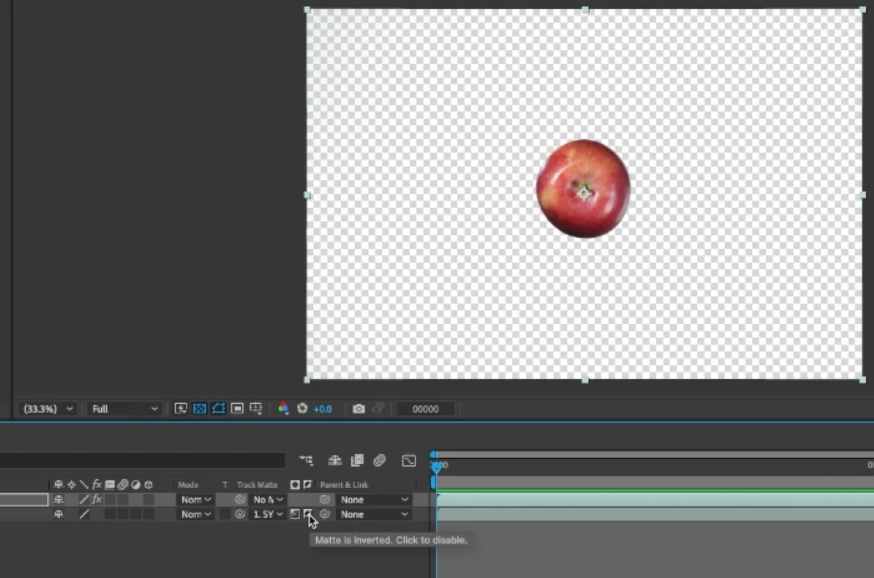
Post-Production in After Effects
Here’s how we composite the FLBL passes in Adobe After Effects:
Import both X1 and X2 image sequences.
Place X1 (main light pass) on the bottom layer.
Place X2 (backlight silhouette pass) on top.
Crush the blacks and whites of the silhouette layer (X2) slightly to create a clean matte.
Set the top layer (X2) as a Luma Matte (Inverted) for X1.
Voilà—you have a clean, crisp composite with no green spill.


Final Thoughts
FLBL may take a little extra setup time, but the results are well worth it. For projects that require clean composites—especially when working with tricky colours or detailed textures—it’s a technique that saves hours in post and dramatically improves image quality.
Got questions about how to implement FLBL in your workflow? Drop us a message—we love nerding out over lighting tricks.
Check out the full tutorial video below for more information:
Stopmotion #Seelearn #Lights #Tutorial #Educational #Aftereffects #DMX


The 8 Ball Jacket Original remains one of the most recognized jackets in streetwear history. Its design symbolizes creativity, confidence, and individuality, making it an enduring fashion statement. Fans of retro and modern style alike continue to embrace its legacy. To find authentic collections, visit Stussy Jacket.